Hi everyone,
Its been a bit since I posted last. Been kinda down dealing with all the snow we have been getting. From 25 to -2 and blizzard conditions in 24 hours. EEk. But my garden survived and is thriving.. now i just want the sun to peek out again.
Anyways, here is a small painting I did for the WDE over at wetcanvas.

I was drawn to this photo for the twisting winding shapes and the textures on the yellow bulbous masses. Now to try and capture that. After I drew out the general shapes and masked out the yellow bulbs I started an under painting with some gambouge for the sunshine and turquoise for the shadows with a little rose madder thrown in for good measure. ;)
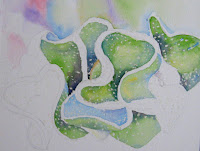
Next I came back with glazes of sap green for overall continuity. And some more glazes of turquoise and gamouge.. making sure the layers are dry.
After the masking was remove I came back in and stippled in some lemon yellow, gambouge, lt red and orange. ** special note, take care not to cover the entire white space with the bulb color, this will lend itself to a tiny highlight adding another dimension. It looked a little flat so after all was dried I took some turquoise and sap green and added just the slightest cast shadow under each bulb. Also I had to go back in with some shadow color and take away some of the yellowness from the bulbs in shadow.

And whoola here you have it.
Aprox 3.75in * 5.25in
Till next time
Happy Painting!!
Comments
Post a Comment