
Halloween Haunt 2014 - How to build a Coffin Prop

Happy Thanksgiving to all my Canadian friends and family. 
“For each new morning with its light, For rest and shelter of the night, For health and food, For love and friends, For everything Thy goodness sends.” Ralph Waldo Emerson


Only 2 weeks left until Halloween so here are a few more last minute ideas you can use in your Halloween haunt.

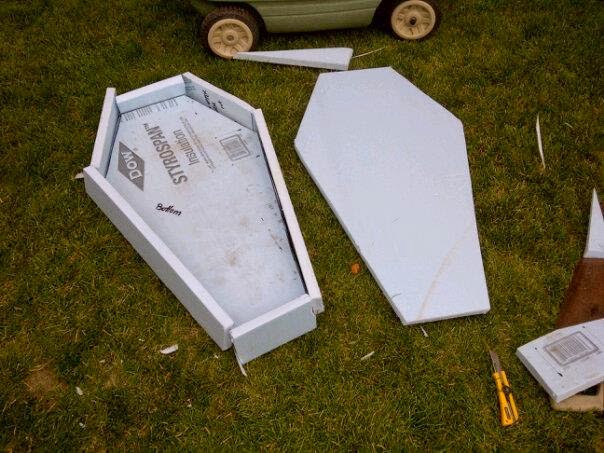
Build your own Coffin:
 I built this one using a half sheet of rigid insulation. I didn't really have any measurements to work from. I just took a piece of paper, scaled it to the size of insulation that I had, drew out a quick plan and cut it out. I used duct tape to stick everything together.
Step 2:
I had some leftover red velour fabric from a Freddy Mercury costume from a couple years ago so I cut it to size and used some carpet tape to attach it to the coffin. Carpet tape is a very strong double sided tape that is weather resistant, permanent and won't melt the foam. Then I used a hot solder pen to melt the wood grain patterns into the styrofoam.
I got out the paint in a black, umber, greys and white and just started painting thin washes of color, trying to get the look of aged wood. The skull on top of the coffin is a dollar store foam piece that I thought was perfect for this piece.
I added a few smaller cheap skeletons that I treated with a Kleenex rotting flesh technique. Then I added a few details like a bow tie and cufflinks for the groom and a veil with a beaded tiara for the bride. And we have "till death do us part - coffin project" 


Comments

Popular posts from this blog

DIY Crayon costume for Halloween

Halloween is my favorite time of year. We spend weeks getting our yard and home decorated all for the night when the little ghosts and goblins come out to play. ;) B started school this year and within her school, they don't do a Halloween per say, they have an orange and black day. So in order to kill 2 birds with one stone, we decided that she is going to be an orange crayon. So with an old t-shirt and a little black felt fabric, this is what I came up with. I think it turned out Awesome! And the best part is that it was a no-sew project. Supplies needed:  1 t-shirt in the size required. 1 box of orange fabric dye (because they didn't' have any orange t-shirts in her size) 1 wooden spoon 1 large container for dying remnant black fabric. I used black felt because that is what I had on hand. 1 pattern for the Crayola font - I used this one Crayola pattern  and made the size adjustments accordingly when I was printing it out. For the crayon label banding, I just wi

Halloween Haunt - DIY Rotting Flesh/ Corpsing prop tutorial

Here is one of the techniques I use to attain the rotting flesh look on cheap plastic dollar store Halloween props.  Supplies you will need: plastic body parts or skeletons cheap plastic wrap - it doesn't matter what brand  heat gun or high-temperature hairdryer wood stain ( I used oak because that is what I had laying around) spray paint ( red and black) craft paint (red, black, dark brown, white, grey and green)   First, wrap your cheap skulls or bones in a few layers of plastic food wrap. It doesn't matter what brand. Then take your heat gun and melt areas away until you get your desired look. Some hairdryers may not be able to get hot enough to do this. Then take your wood stain and start adding a little colour.  Color choices are completely up to you but i used red, flesh, dark brown, black, white, grey. On the skull, I added some black spray paint in the hallows of the eyes to add a little more dimension.  Hope this inspires you to try a new prop id

Sailboat at sunset watercolor painting tutorial

Just a quick demo on how I painted this sailboat at sunset. Colors used: Indian Yellow, Napthol Red, Alizarin Crimson, Royal Blue, Burnt Sienna and Brillant Orange and permenant ink First draw out your image and mask off your sun spot - dry. I chose to use ink as a base to this painting applying it both directly and using it as a wash to add some shadows. Next wet the entire sky area. Working around your sun spot start by adding a graduated wash of indian yellow from the bottom to about 3/4 the way up, then add in alizarin crimson, and at the top work in a band of royal blue letting it run down a little. DRY The sky is not holding the weight I need it to so I wen over it again using the same colors and technique. This time adding a band of brilliant orange along the bottom. Looking better but still not quite there. So lets dry and move on to another area so that I can come back and judge the values. The sails were added using a mix of BS, brilliant orange and indian yellow. D