
Deer Head Appliqued Pillow with Pattern

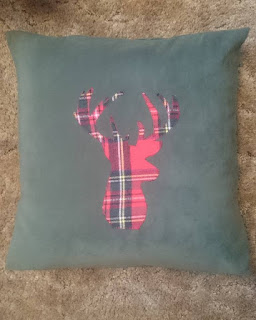
We have seen these deer head pillows everywhere, so I though while we are recovering from the flu, sitting around watching the CFL football semi finals, I thought I would try my hand at this project. I used micro suede and flannel scraps for this project, which makes it very cuddly as well. Yes "Multi tasker" is my middle name LOL
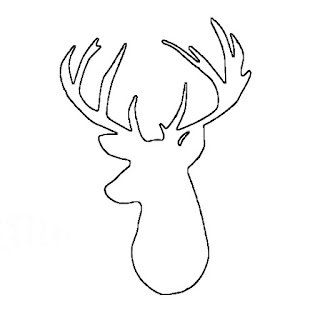
There are alot of patterns on the web for deer head printables, this is the one I chose. 

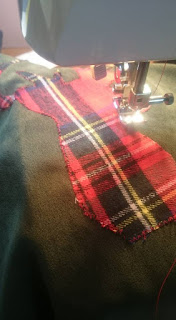
Copy your pattern to the wrong side of your applique fabric and iron down according to the instructions, then cut out the shape.

Remove the paper backing and position the pattern on your cover piece of fabric and iron down.

Select a narrow, close set, zig zag stitch and slowly work your way around the pattern. Remember always leave needle down when turning around a corner.  Pin and sew on the back panels, with a straight stitch and then zig zag for stability. Clip your corners, flip right side out and poke out your corner. Insert your pillow form. Sit back and listen to your guests ooohhh and ahhhhhh. :) Every pillow is different but these are some of the standard measurements for cutting your pattern pieces for the envelope pillow.

Pillow form 14 x 14
(1) 15×15
(1) 15×10
(1) 15×11
Pillow form 15×15
(1) 16×16
(1) 16×11
(1) 16×12
Pillow form 16×16
(1) 17×17
(1) 17×12
(1)17×13
Pillow form 18×18
(1) 19×19
(1) 19×13
(1) 19×14
12×18 pillow form
(1) 13×19
(1) 9×19
(1) 8×19
27 x 27 pillow
(1) 28 x 28
(1) 28 x 19
(1) 28 x 17

Comments

Popular posts from this blog

DIY Crayon costume for Halloween

Halloween is my favorite time of year. We spend weeks getting our yard and home decorated all for the night when the little ghosts and goblins come out to play. ;) B started school this year and within her school, they don't do a Halloween per say, they have an orange and black day. So in order to kill 2 birds with one stone, we decided that she is going to be an orange crayon. So with an old t-shirt and a little black felt fabric, this is what I came up with. I think it turned out Awesome! And the best part is that it was a no-sew project. Supplies needed:  1 t-shirt in the size required. 1 box of orange fabric dye (because they didn't' have any orange t-shirts in her size) 1 wooden spoon 1 large container for dying remnant black fabric. I used black felt because that is what I had on hand. 1 pattern for the Crayola font - I used this one Crayola pattern  and made the size adjustments accordingly when I was printing it out. For the crayon label banding, I just wi

Halloween Haunt - DIY Rotting Flesh/ Corpsing prop tutorial

Here is one of the techniques I use to attain the rotting flesh look on cheap plastic dollar store Halloween props.  Supplies you will need: plastic body parts or skeletons cheap plastic wrap - it doesn't matter what brand  heat gun or high-temperature hairdryer wood stain ( I used oak because that is what I had laying around) spray paint ( red and black) craft paint (red, black, dark brown, white, grey and green)   First, wrap your cheap skulls or bones in a few layers of plastic food wrap. It doesn't matter what brand. Then take your heat gun and melt areas away until you get your desired look. Some hairdryers may not be able to get hot enough to do this. Then take your wood stain and start adding a little colour.  Color choices are completely up to you but i used red, flesh, dark brown, black, white, grey. On the skull, I added some black spray paint in the hallows of the eyes to add a little more dimension.  Hope this inspires you to try a new prop id

Sailboat at sunset watercolor painting tutorial

Just a quick demo on how I painted this sailboat at sunset. Colors used: Indian Yellow, Napthol Red, Alizarin Crimson, Royal Blue, Burnt Sienna and Brillant Orange and permenant ink First draw out your image and mask off your sun spot - dry. I chose to use ink as a base to this painting applying it both directly and using it as a wash to add some shadows. Next wet the entire sky area. Working around your sun spot start by adding a graduated wash of indian yellow from the bottom to about 3/4 the way up, then add in alizarin crimson, and at the top work in a band of royal blue letting it run down a little. DRY The sky is not holding the weight I need it to so I wen over it again using the same colors and technique. This time adding a band of brilliant orange along the bottom. Looking better but still not quite there. So lets dry and move on to another area so that I can come back and judge the values. The sails were added using a mix of BS, brilliant orange and indian yellow. D