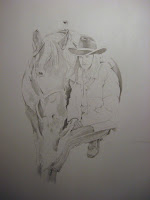
Well it is finally done - thank heavens! And over the next few days I will be posting what I have been working on over the past 2 months. This is a double portrait- kinda - of my second cousin and her favorite pony out in the field. This was NOT the easiest piece I have ever done and it was definatly a challenge going from color to black and white again. On with the show. Stage 1 is the line drawing and the most important of all stages. Careful planning at this stage will guide you through the rest of the process with ease. Remember every line is an opportunity for a value change so plan.. plan.. plan. Hope you can see these first 2 steps


Now its all relative.. LOL ;) I tend to bounce around allot when i work because 1. I get bored easy. 2. I tend to see how one area works against another. If you see in this stage I have started placing some of my darkest darks - the lightest lights will be the paper itself. Any other value that i put in will be in between these 2.

So far there is about 40 hours into this and there is still so much left to do. A little work done on her jeans and boots. I am only going to be using only a hb, 3b and 6b for the main sections and a hb mechanical pencil for the fine detailing. I am also going to leave the background until the very last as I don't want to muddy the piece.

Had to darken my darks a bit more and have worked on her pants. The bottom of this piece will be faded into the ground brush so i just need to go part way down her boots and the horses leg. When i am working on her pony I am constantly thinking about the direction of the hair. This is not a highly detailed piece, relying more on tonal values, but the direction you place you pencil strokes will be visible when the final piece is viewed.

Well the more I get into this piece the more comfortable I am getting with it. Going bold with my strokes and filling in areas without looking at the references. I didn't realize how much she looks like her Mommy until I really started sketching. I kinda panicked when I was asked to do this piece - not only is it a person that should look like the person when it's done but it is also a female teenaged family member and we all know how precious they can be at this age. :)
You can see now that the horses eye is done, the muzzle of the horse looked really off at this stage, but i came to realize that it was because the upper part had shading and the lower part didnt, which was disconnecting the eye.

With Easter I dint get a chance to get any posting done so I am going to upload 2 today. Now this piece is really starting to come together and fall apart all at the same time. I dont know if you can tell but i now have a jelly stain on the WHITE rock. I almost lost it. Had to put it away for a few days and figure out what my next course of action would be. I have 2 months invested and I really dont want to have to start all over again.

Well I can pretty much call Bailey and her pony done until final adjustments are made after the background is put in. I still haven't dealt with the jelly stain. Ill get to that in the next installment.

Morning all. Stage 9 and a few things have come up. I tend to send WIP's to my clients as I am working. Well I sent a progress shot after 8 and I got an email back with the "she's floating in midair" so I brought in some toning to the background and it seemed to bring Bay back down to earth as well as made her pony recede. This client didn't want allot of background detailing - Thank Heavens!! Now that the background is toned there is no avoiding it any longer, the jelly spot really pops. The paper I am working with is a smooth Bristol this type of paper Doesn't lend themselves very well so water or scrubbing. so i had to be very careful. Q-tip and water very gently got up the crusty part and after that dried I used a little sandpaper to smooth out the edges. When I post the Big Finale tomorrow you will be able to see how it just disappears into the picture. Until then..
Happy Painting!

Well here it is finally finished. You will see that the jelly stain has disappeared under some faint scuffs of color to indicate the dry brush out in the field. Like I said it couldn't have happened in a better place. :) The client was very happy with it, but the 15 year old girls reaction was "It looks like i'm frowning" hmmm.. teenagers! LOL
I also wanted to post a picture of the first published portrait that I ever did 15 years ago. Just to show what a little patience and practice can achieve. I still cant believe they ever accepted this for a magazine. EEK!

Happy Creating.
Comments
Post a Comment